- Fumbling about trying to get your headphones up to an adequate volume?
- Here are 5 standard solutions for quiet playback on headphones
- Also, check out this handy guide to fixing static in your headphones!
Quiet or muffled headphones are a common issue with digital playback.
While it’s often the first thought to look at the source material itself (think laptop, TV, phone, etc.), the issue could be coming from various sources in your signal chain–some more tricky to find and diagnose than others.
After spending the past 10 years working in pro audio, I’ve dealt with my fair share of headphone troubleshooting issues.
Read on as we dive deep into why your headphones might be low in volume.
5 Reasons Why Your Headphones Are Too Quiet (With Fixes)
Below are the five most common reasons headphones can start playing back at unusually low volumes, with their respective solutions.
It’s important to read through and try Solutions 1 – 4, even if they don’t directly fix the headphone volume issue for you.
The various clean-up processes involved will do plenty of good for the long-term health of your headphones and playback device.
Also, Solution 5 is a last resort option and should only be done if Solutions 1 – 4 aren’t working for you (and if your devices’ customer support teams can’t help).
1. Problem With The Playback Device’s Settings
Although we often assume our headphones are responsible for playback issues, it’s common for these kinds of problems to arise from the Settings or Preferences active on your playback device.
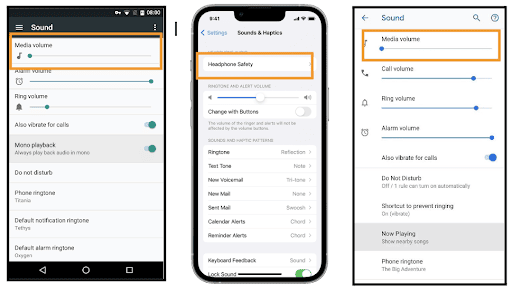
Sometimes, a problem with the volume of a pair of headphones is caused by the settings and preferences active on your playback device.
This could mean your headphones aren’t configured properly on our device’s settings.
By following these steps, we can easily go into our chosen device’s settings menu and check that the volume of our headphones is properly configured:
Sound Settings: Android
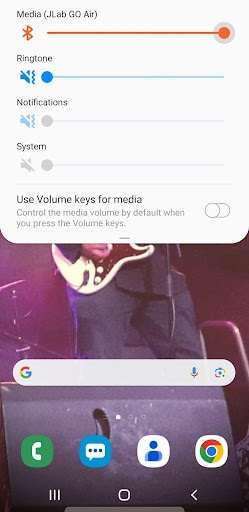
- Open your phone’s Settings app and tap ‘Sound and Vibration.’
- Slide the ‘Media Volume’ button from its default far-left position along the bar.
- Drag the button three-quarters of the way across the bar, and see if your headphones now sound louder.
Sound Settings: iPhone

- Go to your phone’s Settings app and tap ‘Sounds & Haptics.’
- Choose ‘Headphone Safety.’
- Toggle the ‘Reduce Loud Sounds’ switch to OFF.
- Press the Volume Up button on the left side of your iPhone.
- Keep pressing until you can comfortably hear audio through your headphones.
Sound Settings: Windows PC
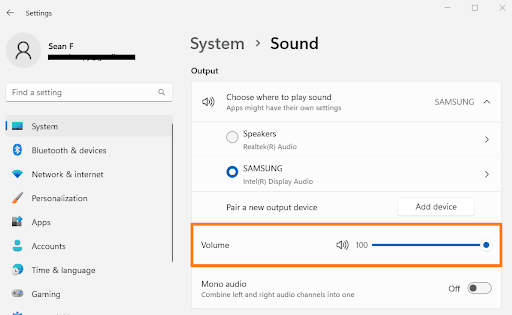
- Select ‘Start’ (Windows icon in the bottom left corner).
- Go to Settings > System’ > Sound.
- Under Output, click the upward arrow ^ across from ‘Choose Where To Play Sound’ on the top bar, and make sure your headphones are selected.
- If this doesn’t fix the issue, go back to the previous menu, and under Output, click the right-facing arrow > next to the name of your headphones.
- Under Output Settings, ensure that the slider for Volume (along with Left Channel and Right Channel) is above zero.
- See if you can now hear audio comfortably through your headphones.
Sound Settings: iMac or MacBook

- Select the ‘Apple Logo’ menu button in the top-left corner of your screen.
- Click ‘System Settings,’ then navigate to ‘Sound’ along the bar on the left side of the System Preferences window.
- Click on the ‘Output’ tab. You should see your headphones listed on the drop-down menu.
Select your headphones from the drop-down menu, and see if this fixes your volume issue.
Sound Settings: Apple TV
- Open ‘Settings’ on the Home screen and go to ‘Video and Audio.’
- Click to adjust Audio Output (Apple TV), and see if your headphones are listed. Adjust headphone volume.
2. Issue With Headphone/Earbud Hygiene
Whether over-ear headphones or a set of in-ear buds we’re using, headphone/earbud hygiene is a deceptively important part of preventing playback problems.
Dirt, grime, and dust can quickly build up in your headphones or earbuds, disrupting the sound during playback – including distorting, muffling, or heavily reducing the volume of your audio.
We can fix this with a simple procedure:
- Simply use an ear-cleaner or ‘Q-tip’ dampened with alcohol or a general-use cleaning solution to clean off unwanted residues inside your earbuds.
- For headphones, simply remove any detachable cushioning and covering cloth from the headphones until you can see any accumulated dirt inside the speaker holes.
- If our headphones are wired and plugged into a phone, laptop, or tablet, we should also perform this cleaning procedure on the input jack (the hole where the end of our headphone cable is inserted). The input jack is usually found on the side of the body of most playback devices.
3. Issue With Headphone Hardware
Headphones, whether wired or wireless, host a wealth of delicate internal equipment.
Sure, they’re covered in durable plastic and cushioned for user comfort and impact control, but what goes on inside is more fragile.
- If you suspect issues internally, remove any detachable cushioning and covering cloth from the ear cups (provided they are not a single piece).
- Check for screws on both your headphones and across their connecting part. Remove them from the headphones carefully.
- Once removed, look inside the headphones for any frayed, loose, or damaged wires. If found, contact your headphone manufacturer for steps on how to fix your particular model (unless you’re adept at soldering!)
- Short of this, you will likely have to seek the help of a professional or send your headphones to the manufacturer for repair.
4. Issue With Headphone Software
Sometimes, the digital information sent by your headphones to your playback device (e.g., phone/laptop/TV) simply begins to hiccup – especially after extended use.
This problem occurs more frequently with wireless Bluetooth headphones, although it occasionally pops up with wired products.
Sometimes, bugs and errors happen with the headphones’ programming. This is a pretty easy one to fix:
- Simply use your favorite search engine on a computer or phone, and type in ‘how to factory reset [headphone brand & model]’.
- Then, follow the given instructions – but be aware that this procedure will erase any custom settings you’ve set up on your headphones! Not your chosen playback device, though – that’s going to be safe.
- Go through the factory reset procedure on your headphones. Then, start them up and reconnect them to your chosen playback device.
- Repeat Solution 1 if need be, and see if you’re now able to hear your audio comfortably through your headphones.
5. Corrupted System Software On The Playback Device
Unfortunately, some playback issues with headphones can arise because of corrupted system data in your chosen playback device.
Sometimes, a full system reset on your playback device is the only way forward.
First and foremost, though, we need to make extra sure it’s not actually an issue arising because of any of the above suggestions.
Undoing system data corruption on a playback device almost always involves a factory reset, and sometimes even sending the device off for custom repairs – which can be an expensive task.
So, only go ahead with this strategy if you’re extra sure that your headphones work normally on other devices, and that your chosen playback device works functionally in other aspects (e.g. starting up and loading apps).
How To Reverse Corrupted Headphone Software
Below, we’re going to take a look at some ways we can safely manage corrupted system data to restore the connection between your headphones and playback device:
- Be sure you’ll be okay with a factory reset on your device. Remember your device brand’s customer support team is there to help advise you before you need to go through with this sort of thing.
- Some companies offer to do it on your behalf. This can be a little expensive sometimes, though.
- If you’re sure you’d like to perform a factory reset on your device, then back up any valuable files to your favorite Cloud or Drive service.
- Ensure you have easy access to all your applications and user settings if you’ll need to re-download and install them again once your device has been reset. Alternatively, store clone copies of them somewhere. Samsung has an app called Smart Switch, which can store these preferences for you on Android and Google phones.
- Use your favorite search engine and type in ‘Factory reset on [device brand & model]’. Then, follow the given instructions – but be aware that this procedure will erase any custom settings you’ve set up on your device! Not your headphones, though – they’re going to be safe.
- Go through the factory reset procedure on your playback device. Then, start it back up and reconnect your headphones via Bluetooth or plugging them in.
Repeat Solution 1 if need be, and see if you can now hear your audio comfortably through your headphones.
*Having issues with static in your headphones? Be sure to check out our post on how to fix static noise in wireless headphones