Removing or isolating vocals from music tracks can turn a song into a karaoke-ready track or create acapella versions for remixing and DJ sets. Audacity, with its array of built-in effects and tools, provides very effective methods for this.
This article walks through how to use Audacity to isolate or eliminate the vocal components of a song, transforming any track into a workable backing track or vocal sample.
Overview and Use Cases
How to isolate or remove vocals from a piece of audio in Audacity depends greatly on the layout of the audio track. There are methods for stereo tracks, mono tracks, and stereo tracks that are converted to mono channels.
If the vocals are center-panned in stereo, as is often the case, there’s a direct method to isolate or reduce them in Audacity. Bear in mind that this method also affects everything that’s panned to the center of the track. But it’s a quick and relatively easy method with some very useful parameter adjusters.
Source Track: Stereo or Mono?
Your source’s channel configuration will determine your route to vocal isolation or removal. Stereo tracks with vocals panned to the center are common. But there are other formats, like mono and surround sound.
In this article, we’ll focus on stereo and mono sources, with emphasis on stereo. In any case, we’ll also briefly cover converting between the two since that’s part of the process for a few common methods.
Audio Panning: An Introduction
To understand center-panning, we must understand panning generally. When you pan an audio track, you’re basically adjusting the levels of the audio signal between the left and right channels.
For instance, panning a sound completely to the left will be heard only from the left speaker or headphones. Conversely, panning to the right shifts the sound to the right channel.
When a sound is panned centrally, it’s distributed evenly between the left and right channels, creating the impression that the sound is coming from directly in front of the listener.
Vocals are usually panned centrally, while other instruments are more spread out in the mix. This often places vocals in a convenient position for isolation, reduction, or even removal.
Preparing Your Track for Vocal Isolation
Much like any project in Audacity, it all starts with importing your audio file:
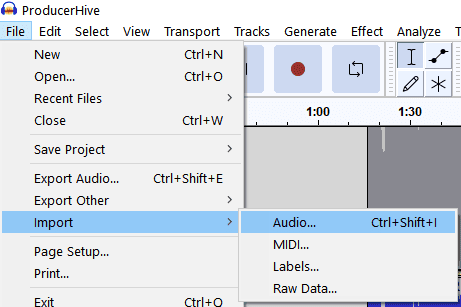
- Launch Audacity and import (File > Import) the song from which you wish to remove or isolate the vocals.
- Duplicate the track. You can do this by clicking the Select button on the track (at the bottom of the Track Control Panel) and then selecting Edit > Duplicate from the top menu. You may want to Mute this track after creating it.

- Having a reference track handy is also helpful, as is often the case in audio mixing. A reference track is a previously recorded and usually professional audio clip that meets the quality standards you’re trying to achieve. In this case, it could be a piece of audio with similar instrumentation to your source but sans any vocals.
Now that you have your track ready, we’ll go into arguably the easiest method to isolate, reduce, or remove vocals in Audacity. After that, we’ll briefly cover an alternative method for stereo sources only.
This method involves splitting your stereo source into two mono tracks, so a backup duplicate is also recommended for this.
Vocal Reduction and Isolation
The Vocal Reduction and Isolation effect is in the Effects > Special submenu. This effect offers several different parameters you can control.

Each parameter serves a useful purpose in perfecting your vocal reduction/isolation:
- Action: This is the exact method you’re initiating and, in some cases, its track setting.
- Strength: In most situations, this will increase the amount of reduction or isolation the higher it’s set.
- Low Cut for Vocals (Hz): Lower this setting to cut lower vocals.
- High Cut for Vocals (Hz): Raise this setting to cut higher vocals.
Note: The default settings are there for a reason. In many cases, these settings won’t need to be changed significantly.
Vocal Reduction and Isolation: Action Menu
The Action dropdown menu has nine different options:

These options are:
- Remove Vocals: to mono
- Remove Vocals
- Isolate Vocals
- Isolate Vocals and Invert
- Remove Center: to mono
- Remove Center
- Isolate Center
- Isolate Center and Invert
- Analyze
Note that the last option (Analyze) will return an analysis of your audio track without changing anything.

All the other options will either Isolate or Remove the vocals using several methods. If you choose a ‘to mono‘ option on a stereo source, that track’s channels will be converted to dual mono channels with the effect applied.
Play around with these settings until you find an effect that works for your song source. Use the Preview button so you won’t need to undo any effects you don’t want applied.
Listen carefully to your previews and audio renders. This process isn’t quite an exact science, which means you need to bring your own unique ear to evaluate your results. Remember to keep duplicates around for backup and a reference track for comparison.
Alternative: Manual Vocal Removal (for stereo source)
This isn’t the preferred method, as there’s less control over high and low-cut settings. But it’s a useful alternative, and learning it may help you understand how audio cancellation works.
Here are the steps:
- Split the stereo track into two mono tracks by clicking the dropdown menu on the Track Control Panel and selecting Split Stereo to Mono.
- Invert one of the two mono tracks by clicking Effect > Invert.
- Pan one track completely left and the other completely right, then play them together.
It’s important to note that when removing vocals panned to the center, other sounds panned to the center might be lost as well in the process. That’s why using the previous method is better to take advantage of filters like Low Cut and High Cut.
Wrapping Up
There are many cases in audio engineering where your ear is your best friend. Vocal removal and isolation is one of these cases. Machine learning apps may be able to do this soon, if not already effectively. But AI can be expensive, whereas Audacity is still technically a FOSS (free and open source) software product.
But for now, Audacity remains arguably the fastest, cheapest, and most effective tool for isolating or removing vocals from almost any song.